
Watch: Manage a health authority question from upload to handoff
This article walks you through managing health authority questions in HAQ Manager. You will upload a question file, review what Weave extracted, prepare each question for authoring, and track the response after the handoff.
Note: Your program's Data Room should contain the source documents your team may need before you upload a question file. You need the HAQ Contributor role to upload questions, edit question details, and assign collaborators.
Upload and review the question file
1. Upload the question file
Open your program, go to HAQ Manager, and click Upload Question File. Select a PDF or DOCX file from the health authority. Choose the Data Room folder where you want to store the file, then start the upload.
After upload, Weave extracts the individual questions, reads the available metadata, and looks for relevant response sources. A progress card shows the processing stages.
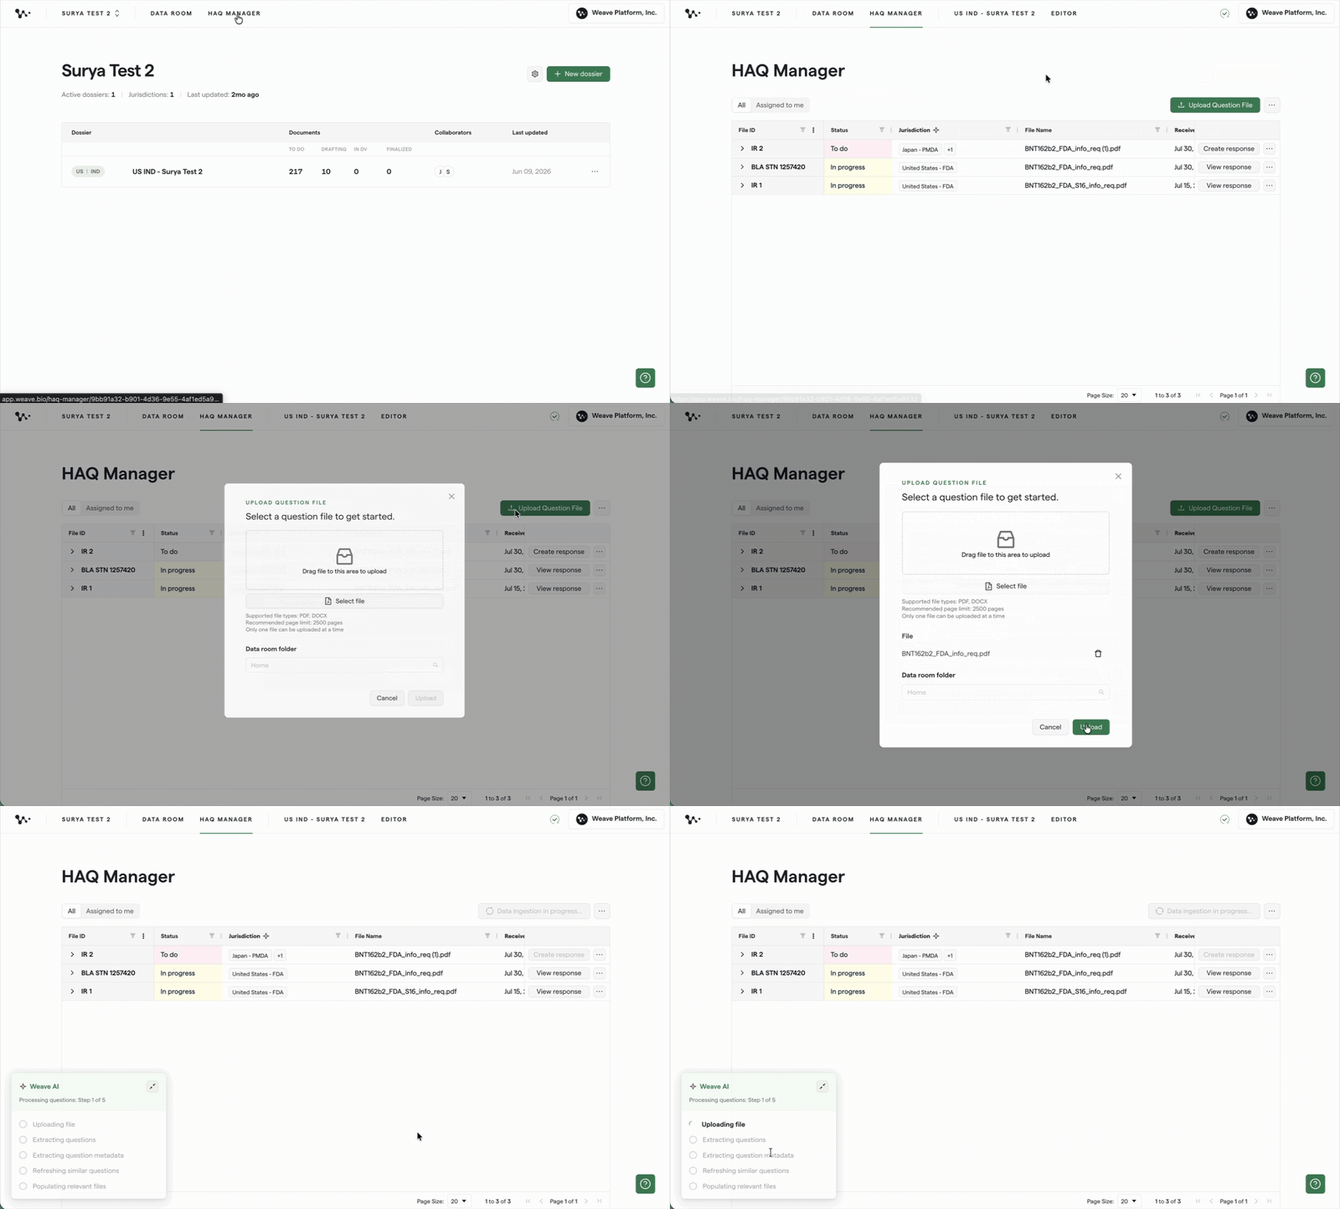
Uploading a health authority question file into HAQ Manager
Weave adds the file to HAQ Manager and displays the extracted questions as individual rows. Next, review the extraction before assigning work.
2. Review each extracted question
Open the uploaded file, then select a question. Click Expand Preview to compare the extracted question with the original file side by side.
Check the question text, question ID, and any subparts. If anything is incorrect or incomplete, edit it before you continue.

Comparing the extracted question with the original question file
Note: Weave may keep subparts together as one question so the full context is preserved. Make sure every subpart appears in the extracted text.
Once the extraction is accurate, you can complete the question details and prepare the response.
Prepare the question for authoring
3. Review the question details
Review the fields in the question panel or HAQ Manager table. A purple star means Weave AI populated the value. You can edit any AI-populated field.
Useful fields include Question ID, Jurisdiction, Type, Discipline, Due date, and Notes. If the question applies to more than one jurisdiction, add the remaining jurisdictions manually. Weave initially selects one best-fit jurisdiction.

Reviewing and correcting question details
Tip: Type and discipline help your team filter and organize questions, but they are optional. They do not affect Similar Questions matching.
4. Assign the response team
Select the people responsible for authoring, reviewing, and approving the response. Set the due date at the same time so everyone can see the expected timeline.

Assigning the response team and due date
Weave includes new assignments in its email notification digest. Use Notes for additional timeline details or other information that does not belong in Guided Setup.
5. Use Expand Preview for the alignment call
Open Expand Preview during your question-alignment discussion. This question-centric layout keeps the extracted question, original file, assignments, notes, and response preparation in one view.
Capture any additional notes your team needs, such as interim dates or follow-up actions. Use Guided Setup for the response strategy and supporting evidence.

Reviewing a question during the alignment call
Set up the response
6. Review the response inputs
Before creating a response, review three inputs: Similar Questions, response source files, and AI instructions.
Open Similar Questions to see related questions from the same program. You can open a previous question, review its final response, and decide whether that response should support the new answer.

Reviewing a similar question and its response history
Note: Similar Questions becomes more useful as your program accumulates submitted responses. A new program may have few or no matches.
7. Review the response source files and AI instructions
Review the files under Response Source Files. Remove irrelevant files and add any missing evidence from the Data Room.
Auto-selected files may display High, Medium, or Low relevance. These tiers are relative to the other files Weave found for the question. Files you add manually remain available to the author but do not receive a relevance tier.

Confirming the response source files
Tip: Ask someone familiar with the evidence to review the source list before you create the response.
Then review the AI instructions. These instructions guide how Weave uses the selected evidence and how the response should be structured. You can manage these inputs separately from Response Inputs, or use Guided Setup to bring them together.
8. Complete Guided Setup
Open Guided Setup when you want to complete the response setup in one workflow. Instead of managing Similar Questions, source files, and AI instructions as separate tasks, Guided Setup brings all three into a step-by-step sequence.
First, choose whether to start from a similar question. If you select one, Weave carries over that question’s response template when a template is available. If you continue without one, Weave prepares response guidance from the current question and selected sources.
Next, confirm the source files and review the AI instructions. You can edit the instructions before saving them. Saving Guided Setup stores the complete response preparation for the handoff to the author.


Preparing the response inputs in Guided Setup
Recommendation: Use Guided Setup to complete Similar Questions, source files, and AI instructions in one step-by-step workflow. You can also manage these inputs manually from Response Inputs when needed. If you do not save Guided Setup, Create Response still creates the response workspace with the default response guidance. If you save Guided Setup, its complete response setup and instructions are used for the response.
With the question, assignments, sources, and response inputs confirmed, you are ready to hand the question to the author.
Create and track the response
9. Verify the setup
Click Verify after you have reviewed the question and its details. Verify marks the setup as checked. It does not generate content or move the question to the next workflow stage.
HAQ Manager saves your changes automatically, so there is no final Save button.
10. Create the response
Click Create Response when the question is ready for authoring. Weave creates the response workspace, changes the action to View Response, and moves the question to In Progress.
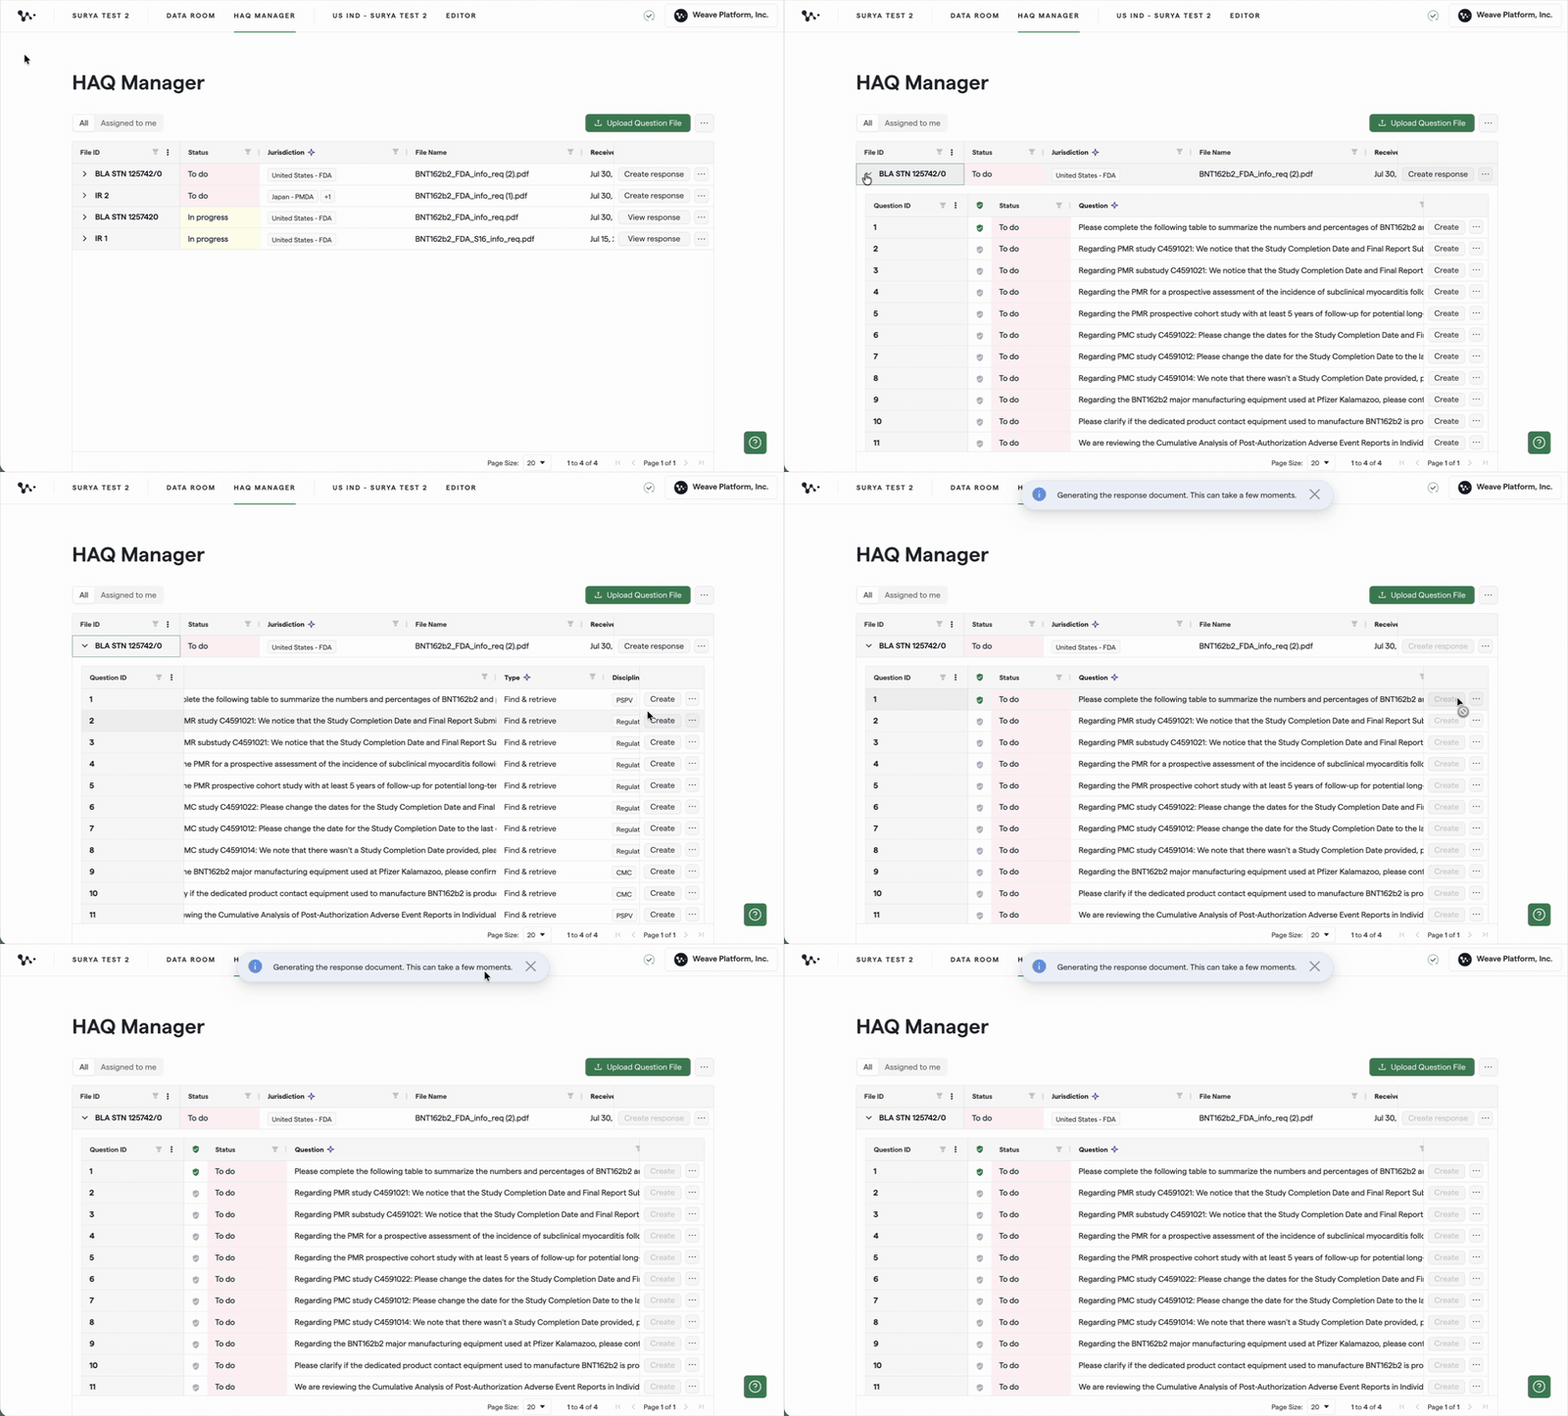
Creating the response workspace and handing it to the author
Important: Create Response captures the current source selection and response preparation as the author’s starting point. It creates the workspace, but it does not generate the draft. The author opens View Response, reviews the guidance and sources, and generates each response section in the editor.
After the final response has been submitted, return to HAQ Manager and attach the submitted file to close the loop.
11. Attach the submitted response
Return to the question after the final response has been submitted to the health authority. Make sure the submitted response is in the Data Room, then attach it under Submitted Response Files.
[GIF: 12 — Attach submitted response.gif]

Attach the main submitted response, not its cover letter or supporting references. This file can appear with future Similar Questions.
Note: HAQ Manager is a reference for future response work. Your organization’s document management system remains the authoritative record of the submission.
Optional question file comparison
If your team receives multiple rounds of questions, use Compare to compare two question files. The comparison groups questions as identical, related, or unique and highlights meaningful changes, such as reworded, consolidated, split, or reorganized questions.
This is useful when an early question list arrives before the official question file. It can show which earlier answers may still apply and which questions need a new response.
FAQ
Q: What does Guided Setup change?
Guided Setup gives you one workflow for reviewing Similar Questions, selecting response source files, and adjusting AI instructions before you create the response workspace.
Q: What happens if I do not save Guided Setup?
Create Response still creates the response workspace with default response guidance based on the question and available sources.
Q: Does Create Response generate the draft?
No. Create Response creates the response workspace and hands it to the author. The author opens View Response and generates each response section in the editor.
Q: Why did a manually added source file not receive a relevance tier?
Only files selected automatically by Weave receive High, Medium, or Low relevance. Manually added files are still available to the author without a tier.
Q: Why are no results appearing under Similar Questions?
Similar Questions searches within the current program. A newer program may not have enough submitted responses yet.
Quick Reference: Manage a question in HAQ Manager
- Open HAQ Manager and upload the PDF or DOCX question file.
- Compare each extracted question with the original file in Expand Preview.
- Review and correct the AI-populated question details.
- Assign the author, reviewer, approver, and due date.
- Use Expand Preview during the alignment call and capture additional notes.
- Review Similar Questions, Response Source Files, and AI instructions.
- Use Guided Setup to complete those three response inputs in one workflow, then save the setup.
- Click Verify to mark the setup as reviewed.
- Click Create Response to create the workspace and hand the question to the author.
- Upload the submitted response to the Data Room and attach it under Submitted Response Files.